Have you ever broken or bent a jump ring with a clasp or bought one already damaged? We've got you covered! Learn how to reattach a clasp and jump ring with the right tools and steps for the job.

Our handy guide and video tutorial will walk you through a few simple steps to save you money and any jewelry mishaps. By the time you’re done, you’ll be able to connect a jewelry clasp and jump ring yourself with ease and finesse.

How To Fix A Clasp - Video

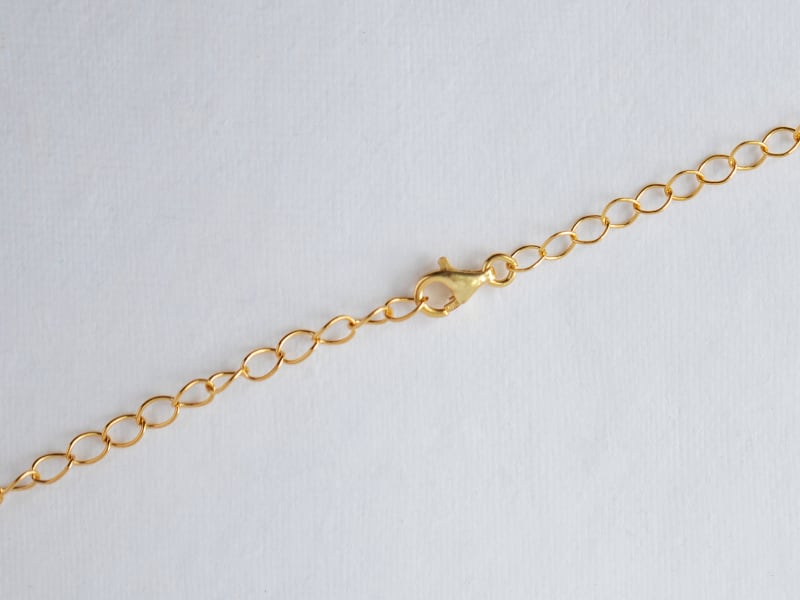
What is a jump ring?

A jump ring is not a special ring that you wear on a trampoline or during a jump rope workout. It’s a part of the small mechanism that keeps your necklace or bracelet on.

To clarify, a jump ring in jewelry is a tiny metal circle that is used to join two pieces of jewelry together or to attach a charm or pendant to a chain or bracelet. It works like a little connector, allowing the pieces to move freely while staying securely together.

Jump rings can come in different sizes, shapes and colors, and are often made of materials like gold, silver or brass. They are an important part of making jewelry and can help add a finishing touch to a piece.

Tools to fix a clasp

There are only a few simple items you’ll need for this job:

  • Two pairs of needle-nosed pliers
  • A clasp and damaged jump ring
  • A little pressure and determination

How to reattach a clasp with a broken jump ring

We hope our jewelry repair video from John Brooks was helpful, but in case you want some extra info or didn’t watch it, we’ve got you covered.

Whether you've had a gorgeous bracelet lying in a nightstand drawer or a beautiful chain necklace that can’t be worn, JTV wants to help get it out, fixed and back on your wrist or neck!

  1. The first step we’ll make is to attach a clasp to the jump ring by inserting it through the clasp hole opposite from its claw. Then, run the broken jump ring through the end of the chain link it was torn from. This will be a chain link in your bracelet or necklace that your clasp was broken from.
  2. The next step will be grabbing one end of the jump ring with a pair of needle-nosed pliers, and we'll then grab the other end with the second pair of pliers.
  3. Now we will use a back-and-forth motion and press both sides of the broken jump ring together. You’ll need to use a little muscle and pressure to squeeze both ends together to create a closed seal.

You’ll find that a lot of the modern pieces of jewelry do not use solder to join these rings so it can take quite a bit of effort to get a jump ring closed and pretty secure, but with the right pliers and little force, it can be done!

How to Fix a Bracelet Clasp - Video

In this episode of JTV’s Jewelry Care Repair series, our host John Brooks shares a simple and helpful lesson on repairing a bracelet clasp. Read below for more information on repairing a bracelet clasp without having to send it to a shop!

Tools to fix a bent bracelet clasp

There are only a few simple items you’ll need for this job:

  • A needle-nosed plier
  • A damaged bracelet clasp
  • A little muscle and willpower 

How to fix a bracelet clasp

The most common reason that a bracelet clasp is damaged, and a bracelet will not stay on your wrist is because its memory has been depressed.  This means the male end, or the tongue has become slack and doesn't catch anymore in the clasp. When your bracelet clasp becomes slack it loses its memory. 

To explain memory let’s think of a metal ruler. When a ruler bends and returns to being flat once it's released, it returns to its natural state, that's its memory. This is like the bracelet clasp in our video. If you bend and weaken the bracelet knob for its catch, it can depress far enough that it won't catch under the lip anymore and falls free. 

  1. The easy way to repair a bracelet clasp is with a pair of pliers. All we have to do is get the end of your needle nose pliers under the tab, lift up very gently, and lift the bracelet tab a little bit at a time. In case you bend your bracelet tab too far up you can always press it back down again. Once you have adjusted your tab on the end of the bracelet, try putting it on. If your necklace snaps in place and stays, you have successfully fixed its clasp!
  2. If your bracelet clasp continues to bend or depress until it doesn’t snap in place, there is another remedy. Pull out the female end, the little box area of the clasp, and use the same needle nose pliers to gently squeeze down on them. Squeeze the female end of the bracelet clasp ever so slightly for a few seconds, and that also will be a good fix for the same problem.
  3. Another issue that can arise is with the clasp safety. If the memory is no good and the safety is bent, it can just slip on and off. To correct this, use the needle nose pliers in the middle of the clasp, if there's a slight bend you can pinch down on it and squeeze it ever so slightly. This will push it back on and snap right back into place.

We hope this guide helped, and you learned something at the same time! For more handy information on jewelry care and repair, you can watch our helpful jewelry repair videos on JTV’s YouTube playlist. To learn how to properly clean your jewelry without damaging it, check out our jewelry cleaning guide.

Author

Jacob finds JTV's Jewelry Care and Repair videos to be an interesting and helpful series for jewelry fans. If he can help people save money and fix their jewelry clasps, then this guide did its job!

Read more about Jacob on his author page.

Jacob Maurer