How-To: GemVue Table Top Polariscope
Published: March 2013
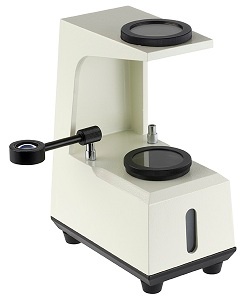
The GemVue™ Table Top Polariscope is one of a series of tools that facilitates the process of gemstone and mineral identification. It is used in conjunction with other gemological tools to narrow the range of possible identifications. The primary purpose of a polariscope is the determination of optic character. Gemstones (and minerals) commonly exhibit different structural forms. Some may be amorphous (without crystal structure), singly refractive (Isotropic), doubly refractive (Anisotropic), or an aggregate of numerous microscopically small crystals. Each of these structures responds differently when viewed through a polariscope. These structures are at the molecular level and not seen even with a microscope, but the polariscope gives us clues to this structure. The polariscope can also locate a gems optic axis if it has one.
This tabletop unit complements several other key items found in the Jewelry Television® line of gemological tools and equipment. It is often paired with the refractometer and features a light that can be used for refractometer testing.
The Science Behind Your GemVue Polariscope:
Each polariscope contains two polarizing filters. The topmost is called an analyzer, and the lower a polarizer. The analyzer has a reeded edge similar to that found on a coin. It may be rotated to the left or right. The polarizer, or lower filter, is stationary and can be found aligned below the analyzer on the base of the polariscope.
For convenience of use, a gem stage module is provided. The gem stage serves as a rotating platform for any gemstone being tested. The gem stage fits over the polarizer. The gem stage can be easily rotated left or right. It also has a reeded edge like the analyzer.
Each polariscope also comes with a removable optic figure sphere attached to a rotating arm. This is used in more advanced applications to resolve optic figures and its use will be covered in Advanced use of the GemVue™ Table Top Polariscope.
Depending on how the analyzer (top filter) is aligned with the polarizer (bottom filter), it can totally block or permit the passage of light. When both filters are in the dark position (no light visible), it is referred to as crossed polars. When rotated 360°, the filters will go light and dark two times. Rotating the analyzer 180° brings it back to its original dark or light position.
Using Your Polariscope:
Precautions and Limitations: When using your tabletop polariscope remember the gem must be transparent to translucent for testing. Dont test opaque and near-opaque stone with a polariscope. Also, the polariscope is not reliable in certain cases such as red stones with a RI above 1.70 like spinel or garnet or stones that are twinned, meaning the crystal grew in more than one continuous direction. The polariscope is one test that is highly useful for rough, beads, or cabochon gems, but can be of limited use for gems set in jewelry. Testing set stones is limited by the mounting and the angles you can view the gem; only some set gems will give results.
Step one: Take your sample (gemstone or mineral), clean it with a cloth, and place it on the gem stage. Using tweezers may facilitate the placement of your sample. Set the gem stage aside for the moment.
Step two: Activate your light source located on the back of the unit.
Step three: Look down through the analyzer and view the light source. Turn the analyzer (top filter) left and right. You will notice that the light becomes brighter or darker, depending on the initial position of the filters. Turn the analyzer to the dark position (crossed polars).
Step four: Gently place the gem stage with the gemstone over the polarizing filter. Rotate the gem stage 360° and observe the response through the analyzer. There are four possibilities.
1) The sample appears light through the entire rotation. It is an aggregate (AGG).
2) The sample appears dark throughout the entire rotation. It is singly refractive (SR) or amorphous (such as some glass) or it is doubly refractive and the stone is oriented along its optic axis. Change the orientation of the stone and repeat to conform accurate results.
3) The sample blinks light and dark 4 times during a full 360-degree rotation. The sample may be doubly refractive (DR) or SR ADR.
4) The sample may exhibit irregular blinking that appears as snake-like bands or crosshatching. The stone is possibly amorphous or SR with anomalous double refraction (ADR), or may be DR but has a twinned growth pattern. Glass, plastic, amber, garnets, and synthetic spinel all commonly exhibit ADR and identification must be confirmed by other tests
The first three responses require no further tests. Response 4 requires confirmation tests to determine the true optic character of the sample. Again, red stones with an RI above 1.70 like spinel or garnet should be confirmed by other means. Not all polariscope results will be conclusive. If you do not observe results 1 thru 3, you must use other tests to identify the gem. Hint: a refractometer will usually resolve this question.
Confirmation Test:
Step one: Make sure the polariscope is in the dark position. If you have removed the gem stage, place it back in the polariscope frame.
Step two: Turn the gem stage until the stone appears be at its lightest point. Be sure the filters remain in the dark position.
Step three: Quickly rotate the analyzer to the light position. The gem stage remains stationary. Observe the lightest area of the stone and see if there is any change. There are two possibilities:
1) The sample looks noticeably lighter it is singly refractive (SR) or amorphous, but shows ADR
2) The sample looks the same or slightly darker it is doubly refractive (DR)
Maintenance Tips:
When not using your GemVue Table-Top Polariscope please take the following precautions to extend the life of this product.
- Unplug the unit when not in use.
- Do not touch the lenses. Clean with a damp (water) lint-free cloth.
- Use the cover shown to protect the unit from dust.
- Store in a cool, dry place.
How-To: Advanced Use of the GemVue Table Top Polariscope
For those who have already mastered the techniques covered above, this section is for you. While the polariscope is limited in the tests it can perform, there are certain cases where it is extremely helpful, particularly for transparent rough stones, cabochons, and beads.
Resolving the Optic Figure:
When resolving the optic figure the stone must be:
-Doubly refractive
-Transparent or nearly transparent
-Single crystal (not an aggregate)
-Of a size to fit in your instrument
Resolution Test
1. Begin the test with the polariscope in the dark position, also known as crossed filters.
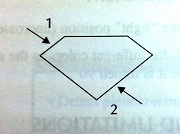
Possible Axis Orientation
2. Hold the stone in your fingers between the crossed polars, then start rotating the stone in all directions to look for rainbow hues (interference colors) on the surface of the stone that will show you the optic axis. The optic axis follows an invisible, straight line through the stone.
3. Look for the figure using the follow-the-brush-technique. Find the blinking extinction pattern. Tilt the stone to look down the narrow end of the dark extinction brush. NOTE: For many biaxial stones, this is the only way to find the optic axis. In some stones it is extremely difficult to find and sometimes not possible.
4. If you dont see interference colors or a dark extinction brush:
-Touch the optic figure sphere to all parts of the stone while you turn it. This might help you find an optic figure, even if you didnt see a sign of an optic axis direction earlier.
-Place a drop of water on the optic figure sphere, or put the stone in an immersion cell filled with water. Liquid reduces surface reflection and internal refraction.
5. Once you find the interference colors, place the optic figure sphere on the heaviest concentration of intense colors. NOTE: Once you find interference colors in one direction you may try turning the stone 180°, then look for them in the opposite direction to see a clearer optic figure.