How to Make a Girly Twirly Bracelet and Earring Set
Published January 2013
Designed By Margot Potter / Content Supplied by Beadalon

Techniques
Basic Wirework
Materials & Tools
Four 6mm round 1-hole purple CZs
Four 6mm round 1-hole lavender CZs
Three 5mm round 1-hole lavender CZs
Three 6mm round 1-hole champagne CZs
Two 9x6mm tanzanite Swarovski™ teardrop beads
One 6mm purple velvet Swarovski™ rondelle
Two 3mm jet Swarovski™ rounds
Two 6mm topaz Swarovski™ rounds
One 6mm crystal copper Swarovski round
Metal framed brass letter charms to spell Girly
Four gold plated oval flat rings
Four copper open heart charms
Five copper small s-hooks
One copper small toggle clasp
Twenty six 6mm copper jump rings for base chain
Approx. Twenty three 6mm copper jump rings to attach charms and dangles
Four round beaded gold rings
Approx. 15 3mm gold plated jump rings (Or lightweight gold plated jump rings)
Five 22 gauge Natural coiled natural copper wire charms created while working from spool with approx. 2.5 of wire for each charm
Four copper ball/star head pins
Designer Ergo Round Nose Pliers
2 pairs Designer Ergo Chain Nose Pliers
Designer Ergo Cutter
Nylon Jaw Pliers
Bead Mat
How to:
1.The idea of this bracelet is that you take the core elements of jump ring copper chain connected with copper s-hooks and add your own soup of girly goodness to the mix. The ingredients you need are listed above. Here are the basic bracelet instructions.
2.Create base chain by attach toggle circle to a 6mm copper jump ring using 2 pairs of chain nose pliers to open and close ring. Attach 5 more jump rings forming a chain and slide the last ring in this first chain length to one end of a copper s-hook. Use chain nose pliers to open and close jump rings and to compress s-hook completely flush so the chain cannot escape.
3.Add a 5 link jump ring chain to the other side of the s-hook and attach another s-hook as before. (Secure s-hooks so chains cant slip off.)
4.Repeat three more times. Add a final 2 links of jump rings to fifth s-hook and attach the toggle bar to this end.
5.The core dangles are the Girlie charms; they should be attached on the third jump ring from the toggle circle and the third jump ring from each s-hook working from right to left. Use the 6mm copper jump rings to attach them.
6.The flat oval gold rings are attached on the fifth jump ring from the toggle circle and every fifth jump ring from the s-hooks working right to left.
7.To create the copper coils work from the spool. Use your round nose pliers to begin a tight loop and place this inside of the nylon jaw pliers while you create a flat coil working the wire around the center loop clockwise approximately 3 or 4 times around.
8.Create a bail on the coil dangle using round nose pliers to make a loop that is perpendicular to the coil. The loop should face backwards from the flat coil so it will dangle forward on the bracelet. Cut off excess wire.
9.Create the following beaded coil top dangles using the ball/star headpins: tanzanite teardrop; copper crystal rondelle and tanzanite teardrop; topaz rondelle, jet round and violet opal rondelle; topaz rondelle, purple velvet rondelle and jet round.
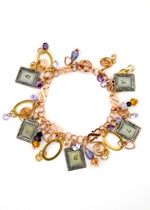
10.The charms, coils, crystals, CZs and metal dangles should be attached in a random asymmetrical but balanced fashion, adding some to the flat coils, some to the copper coils, some to the base chain...as in the photo. Try not to think too hard and be intuitive!


