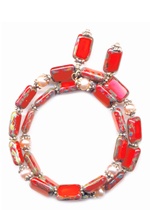
How to Make a Fiery Pearl Bracelet
Published January 2013
Designed By Ann Dillard / Content Supplied by Beadalon
Techniques
Basic Wirework
Materials & Tools
Two continuous coils of bracelet
Remembrance Memory wire
Two 2” silver head pins
Twenty small silver flower bead caps
Fourteen small silver spacers
Twenty-Three 10X6mm red shaved glass rectangle
Beads with Picasso finish
Eight 4mm pink pearls
Memory wire shear
Round nose pliers
Chain nose pliers
Nipper Tool
Designer Bead reamer
Matches or lighter
Notes:
Heat the tip of the memory wire with match or light that is going to be bent. This anneals the metal and makes the wire much easier to bend and get “pretty” loops.
How to:
1. Thread onto one headpin, one small bead cap, 1 rectangle bead and one bead cap and make a loop at top to create charm. Repeat to make a total of two charms.
2. Make a loop at one end of the memory wire and attach one of the created charms, secure by closing loop.
3. Thread one small bead cap, one pearl, one small bead cap, one rectangle bead, one small silver spacer, one rectangle bead, one silver spacer, one rectangle bead. Repeat this pattern starting with one small bead cap until there are a total of 7 units. End by threading one small bead cap, one pearl, and one small bead cap.
4. Cut wire long enough to create loop. Make loop at end of wire and attach other charm and secure by closing loop.


