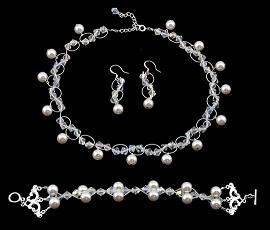
How to Make a Lacy Bridal Set
Published January 2013
Designed By Margot Potter / Content Supplied by Beadalon
Techniques:
Stringing, Crimping, Simple Wire Loop
Materials & Tools
Beadalon 49 Strand .018 in. silver plated wire
2 - 3-to-1 Victorian filigree ring-end connectors, silver plate
2 - Dapped and spring French ear wires, silver plate
1 - 7mm Medium spring ring clasp, silver plate
2 in. plus 2 links - Medium curb chain, silver plate
14 - 24 gauge 1 in. Head pins, silver plate
1 - Small toggle clasp
12 - Size #2 Crimp tubes, sterling or silver plate
81 - 6mm Clear A/B glass bicone faceted beads
28 - 8mm Créme round imitation pearl coated glass beads
Designer crimper
Designer round nose pliers
Designer chain nose pliers
Designer flush cutter
Notes:
To complete this project, you will need to be familiar with crimping beads in place on wire, head pin turning, opening and closing metal rings, and weaving stranded wires. The key to weaving with wire is working carefully to maintain the proper tension while moving along the design. Take time to adjust tension before finishing of the ends.
This ethereal design creates the look of lace with the fabulous Beadalon 49 Strand silver plated wire to create the look of spun silver lace - the lustrous sheen of the exposed wire is both delicate and beautiful. Perfect for a bride for her big day - or a beautiful gift for bridesmaids - or the finishing touch for Senior Prom. It is an elegant, timeless design for any special occasion.
Necklace How to:
1. Begin with a 24 in. length of silver plated wire. Add two bicone beads to one end. Loop the wire over the beads and thread it back through the two beads to create a loop. Tighten enough to keep the beads secure and leave an exposed wire loop.
2. Repeat the looping process described in step 1, but leave the loop on the opposite side, mirroring the first loop. The wire will create a serpentine “S” shape as the design progresses.
3. Continue along the choker until you reach the end - 28 stations and 56 bicone beads. Check back over the design for continuity before finishing. The loops should all be of consistent size.
4. Using a crimp tube, attach one end to the 2 in. length of curb chain.
5. Using a crimp tube, attach the other end of the strand to the spring ring clasp.
6. Thread 14 pearls onto 14 head pins and loop each one, trimming the excess wire.
7. Attach the pearly head pins to the bottom loop (every other station of two bicones) of each “S” curve. Use pliers to open and close the loops securely.Designer Hint: Open and close jump rings and wire loops to the side rather than pulling them apart; this will cause less stress on the wire. And less stress means better longevity for the whole piece.
8. For an elegant, professional touch, add one bicone crystal looped on a head pin loop to the end of the curb chain. A little extra sparkle adds a radiant finishing touch.
Earrings How to:
1. Using 3 in. segments of silver plated wire, create two 2-loop stations, finishing the ends with a secured crimp tube. Use a crimp tool to make sure that your tubes are completely securing the wire ends.
2. Add one looped headpin with an 8mm pearl to the bottom of each 2-loop segment.
3. Attach an ear wire to each segment. The earrings should be mirror images: oppose the direction of each earring for a more professional look.
Bracelet How to:
1. Using crimp tubes and a crimp tool, attach three 12 in. strands of silver plated wire to a 3-to-1 Filigree connector.
2. Thread one pearl on each of the two outside strands.
3. Thread two bicones on the center strands.
4. Thread all three strands through one bicone bead.
5. Continue with this pattern, tightening as you go to create tension, until the strand comprises 6 total groups of beads.
6. Check through the piece to tighten it before crimping. The 2 pearls should rest on top of and between the two bicones, leaving some exposed wire.
7. Using crimp tubes, attach the three strands to a second 3-to-1 Filigree connector.
8. Use a jump ring to attach the circle portion of the toggle clasp to one 3-to-1 Filigree connector. Attach the toggle clasp bar to the other 3-to-1 Filigree connector using the two chain links.


